|

Tag Tutorial
View Other artists Results
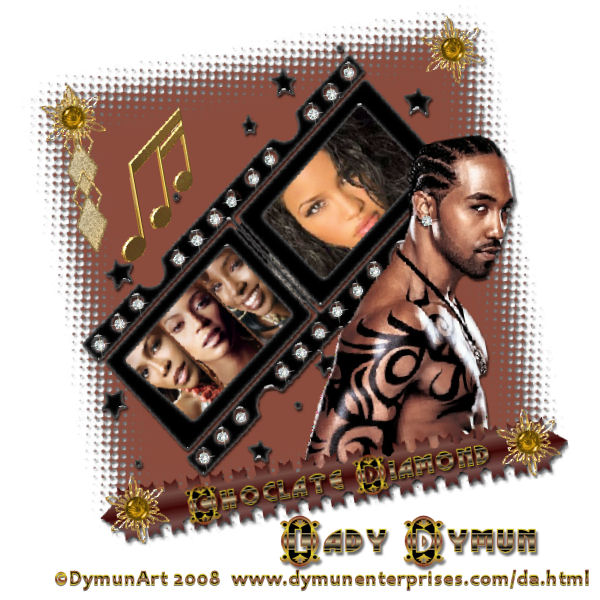
I love working with diamonds, it's the diva in me
lol.
You will need to have an intermediate knowledge of PSP.
I use Corel PSP XI. In this tutorial you will be using 2 filters and the pen tool.
Supplies needed:
Corel PSP - Get a Free Trial .:Here:. ;
Alien skin Eye Candy 5
Impact Plugin - .:Here:.
Filters Unlimited 2.o Plugin
.:Here:.
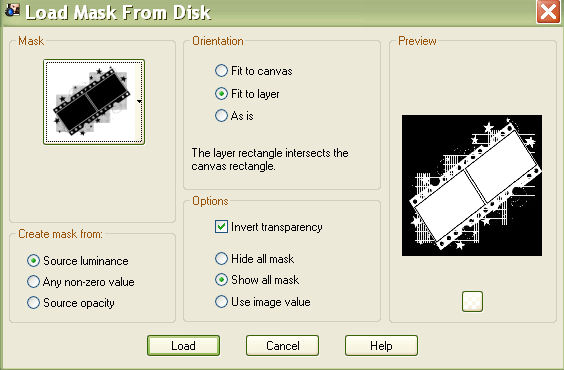
Film Strip Mask .:Mask:. Right click
and save to your mask folder.
.:Diamond:.
Click to download tube to your hard drive.
Tubes of your
choice
Font of your choice. I used "Cameo Appearance"
@ 50 pixels.
Destiny's Child and Cassie tubed by me.
Male model
tube
© DBK Designs by Katrina
Let's get started!

You make take this pointer along with you to keep track of
where you are.
Just click and drag the pointer!
Open a blank transparent canvas 600x600 pixels. Flood fill black.
Layers/Load Mask from Disk (see diagram below for settings)
Merge group
Image/Resize/90%/All layers unchecked.
Selections/Freehand Tool - Draw rectangle inside one frame of the Film Strip, hit delete on your keyboard. (See Diagram below)
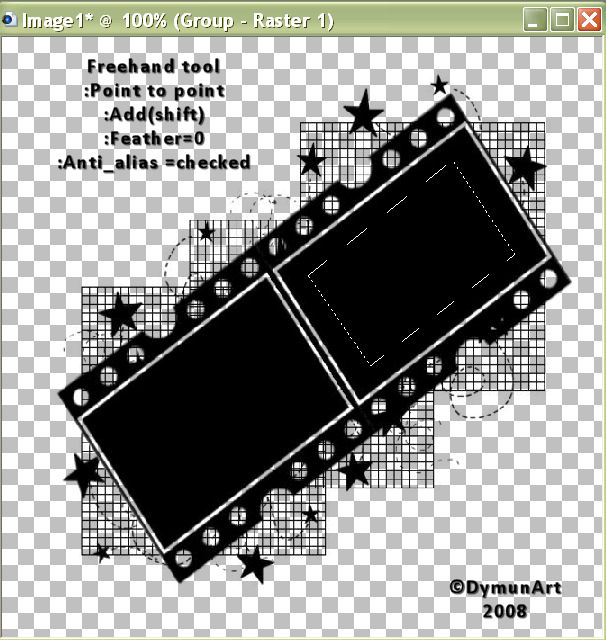
Selections - None
Repeat these steps for the 2nd frame in the Film Strip.
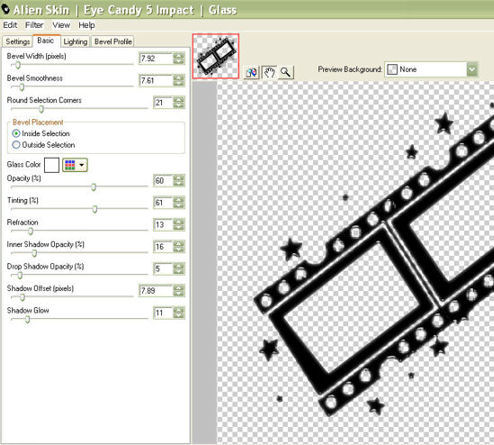
Effects/Plugins/Alien Skin Eye Candy
Impact/Glass (see diagram and apply settings)
Open the Tiny Diamond tube. Edit/copy/paste as new layer.
Duplicate 22 times and place a diamond in each of the Film Strip holes.
Layers/Merge/Merge visible.
Open your 1st tube for the
Film Strip frame. Resize if needed. Rotate as needed and place inside of one
of the frames.
Move this layer down under Film Strip.
Erase any
overlapping parts of tube. (See my tag for an example).
Merge these layers. Repeat steps with 2nd tube.
Layers/New
raster layer - Flood fill with a color from one of your tubes.
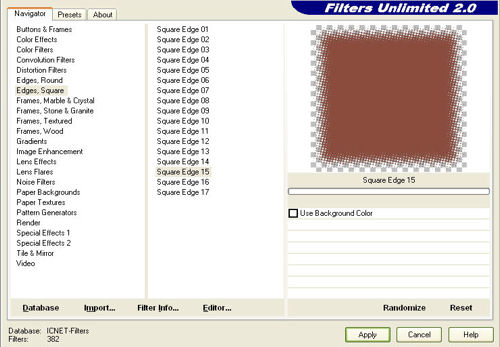
Effects/Plugins/Filters Unlimited 2.0 apply an Edge using the settings
below. (see diagram)
Activate the Pen tool. Select a color or gradient to compliment your tag.
Select Opposing Arrowheads-Overlap with these
settings:
Width = 9.00
Anti-alias = checked
Join = 1st symbol
selected
Miter limit = 15.
Draw a line the length of the solid "Edge"
layer.
Layers/Convert to raster layer. Place where your text is to
be.
Add accents and embellishments to compliment your tag, add drop
shadows as appropriate.
(You may use the move tool at this point to
arrange the layers where they will most compliment your tag.)
Open
your large (primary) tube. Place where you like; add drop shadow.
Add
text, and copyright info.
Resize if desired.
Layers/Merge/Flatten
all. Save as JPEG.(Weight approx. 100kb)
or,
Layers/Merge
visible. Save as PNG.(Weight approx. 400kb)
I hope you enjoy this tag as much as I enjoyed creating it.
Hugz N' Luv
Lil

This tutorial is created and written by me. Any resemblance to
another is totally coincidental and unintentional.
This tutorial is to be used for non-commercial purposes only. You may share this tutorial in PSP
groups. Tubes and Mask used here were obtained from group shares. All
copyrights belong to the original creators.
Screen Gems Tutorial © Lil Dymun/DymunArt March 19, 2008, all rights reserved.
Back to Top
Please send me your finished product to
display on a "Results" page.
I will link back to you if you wish.
Contact
Try my © A Fairy Pool, copy; Be My Valentine
© Cool Diva and © Moon Witch Tutorials.


Home |About
Me | Awards | Blog | Chat
Room | Clip
Art | Copyright | Contact | Fun Stuff | Gifts |
Memberships | MySpace | Privacy Statement | Scrap Kits | Site
Map | Stationary | Tags | Terms Of Use |
Top Site |
Tutorials | Vote
(OSVP) | Websets
|
