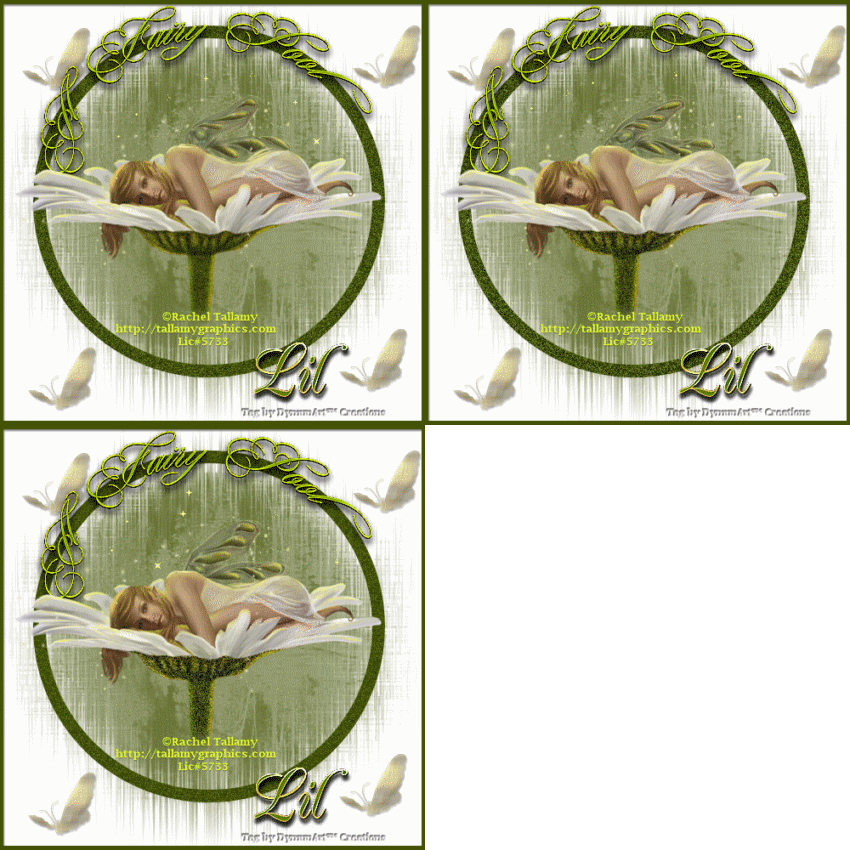
A Tag Tutorial
View Other artists Results

This is an animated Tag tutorial created in Corel Paint Shop Pro Photo XI and EZ Gif Animator. The animation can be done in Animation Shop 3 or Ulead GIF Animator 5 as well.
I hope you enjoy this tutorial.
Please send me your finished tag. I would love to see your results!!
Contact me via the link at the bottom of this page.
What's needed:
An Intermediate knowledge of PSP;
Corel PSP - Get a Free Trial .:Here:.
Alien skin Eye Candy 4000 and DSB Flux Plugins .:Here:.
(You will need these for the animation effects.)
Here are links for animation software:
Animation Shop 3
EZ Gif Animator
Ulead Gif Animator

Supplies
I used the beautiful art of Rachel Tallamy You may purchase her work at her site.
(Click the link, it will open in a new window).
Now Let's Get Started!

You are welcome to take this pointer with you,
You can keep track of where you are
(just click and drag).
Open a blank canvas 500x500px, flood fill white.
Open your tube, Edit/copy; Edit/Paste as New Layer (resize if necessary)
Hide your tube layer, (make sure it is at the top of your palette.)
Layers/New Raster Layer, flood fill with a dark color from your tube.
Layers/Load Mask from disk (or Load Mask from Image if you have the mask on your work space.)
Apply the mask Saphiere_GraphicDream_Mask_Water24.jpg with these settings:
Source Luminance - checked; Fit to Canvas - checked; Invert transparency - NOT checked; Show all mask - checked.
Layers/Merge/Merge group.
Layers/Load Mask from disk (or Load Mask from Image if you have the mask on your work space.)
Apply the mask TJ-blastedcircle.jpg. Layers/Merge/Merge group. Layers/Merge/Merge down
Layers/New raster layer
Selection tool - selection type=Circle; mode=Replace; Feather=1; Anti-alias=checked.
Starting in the center of the canvas draw a circle large enough to encompass the solid circle in the mask layer. ( See my tag for example)
Selections/Modify/Select Selection borders: border width=15
Flood fill with dark color from your tube. (Resize if necessary to fit the circle in the mask.)
Duplicate this layer 2 times. Name the layers r1, r2 and r3 if you like.
Acitvate layer r1, Effects/plugins/dsb flux/Bright Noise: Intensity - 23; Direction - mixed.
Close Layer r1, activate Layer r2, Intensity - 36, then Layer r3 Intensity - 47.
Go back to your tube layer. Duplicate this layer 2 times. You may name these layers t1, t2 and t3.
Choose a section of the tube you would like to have the Noise effect and outline that section on t1 with the Selection 'freehand' tool with these settings:
Freehand; point to point; Feather=0; anti-alias=checked.
Effects/plugins/dsb flux/Bright Noise:(Use the same settings as above for the ring layers, follow the same procedure.)
Selections/Select None.
Now choose a section of your tube where you want to apply the jiggle effect. (If you are using a Fairy, the wings are perfect for this.)
Outline this section with the Selection 'Freehand' Tool with the same settings as above.
Effects/plugins/Eye Candy 4000/Jiggle with these settings:
Movement type=Bubbles; Bubble size=50.00px; Warp amount=10; twist=20; Seamless tile=unchecked; click 'Random seed' one or more times to move the graphic to your liking. Click OK.
Close off Layer t1 and ativate t2 and repeat the effect procedure. Then with t3.
Activate the tube tool (you should have installed/placed the Tiny Sparkle tube in your tube folder in your PSP files) get the tiny sparkle and randomly place sparkles above your fairy(tube) [see tag for example].
Place on each tube layer.
Now if you want other accents or embellishments on your tag, place them now on the bottom (mask) layer.
Also add copyright and your info if you wish.
With this layer still active, go to Selections/Select all; Selections/Modify/Select Selection borders: border width=5, hit delete on your keyboard.
Layers/New raster layer (this layer should be right above your bottom 'Mask' layer)
Flood fill with the dark color from your tube. Add drop shadow with these settings: V=5, H=2, Opacity=50, Blur=5, Color=Black.
Layers/Merge/Merge down.
Now we are going to add the tag title to the ring layers.
To create 'text on a curve' we will need to use the 'Preset Shape' tool.
First choose 2 colors from your tube a foreground and a background for your text. I used the font 'Portfolio' which is included in the supplies.
To use it just open it and minimize it on your desk top ant it will be available for use when your PSP is open.
With the preset shape tool select the ellipse. Draw a cirle the same size as your ring. (This will create a vector layer, be sure you are creating this layer right above Layer r1).
Don't be concerned about this cirle, it will be deleted.
Now get the text tool, I used size 55, adjust size to fit your tag. Place the 'A' on the curve of the circle, when the line under the 'A' is curved click to add your text to the circle.
Use the space bar on your keyboard to move the text around the circle. When you have your text placed click Ok.
Now go to this layer on the layer palette and click on the +
Go to the sub-layer 'text', right click and click on 'convert to single shape' on the drop down menu. Then go to the 'ellipse layer' and delete.
Now you should have text only, no ellipse. You may now use the move tool for perfect placement and the 'free rotate' commands if necessary.
Add a drop shadow on the text with these settings:
V=1, H=0, Opacity=70, Blur=0, Color=Black
Adjust/One stop photo fix; Adjust/Sharness/Sharpen; Adjust/Sharpness/Sharpen More.
Add a drop shadow with these settings:
V=5, H=2, Opacity=50, Blur=5, Color=Black.
Duplicate this layer 2 times. Now close off all layers except the text and ring layers. Now close off layers 2 and 3 of these layers.
With the first layer of text and r1 active, Layers/Merge/Merge Visible. Now close this layer and open the 2nd text layer and r2 and repeat merge. Repeat with the 3rd layers.
You should now have 7 layers, 3 tube layers, 3 ring layers and the Mask layer. Activate the Mask layer.
Close layers 2 and 3 of the tube and ring layers (You should have t1 and the 1st ring layer and the mask layer open) Layers/Merge/Merge visible
Edit/copy
Now open your animation software, Edit/Paste/As new animation. Back to PSP.
Click your back button once. Close layers 1 and open layers 2. Repeat the merge and copy process. Back to animator, paste as new frame (after frame in AS). Repeat with layers 3.
Set speed properties to 30 and save as .gif file.
I hope you enjoy this tag as much as I enjoyed creating it.
Hugz N' Luv
Lil 
This tutorial is created and written by me. Any resemblance to another is totally coincidental and unintentional. This tutorial is to be used for non-commercial purposes only. You may share the link to this tutorial in PSP groups. Masks used here were obtained from group shares. All copyrights belong to the
original creators.
A Fairy Pool Tutorial © Lil Dymun/DymunArt™ Creations
Jan 5, 2009, all rights reserved.
Back to Top
Please send me your results to post for others to see. I'll link to you if you wish.
Contact
Try my © Screen Gems © Moon Witch © Cool Diva & © Be My Valentine Tutorials


Home |About
Me | Awards | Blog | Chat
Room | Clip
Art | Copyright | Contact | Fun Stuff | Gifts |
Memberships | MySpace | Privacy Statement | Scrap Kits | Site
Map | Stationary | Tags | Terms Of Use |
Top Site |
Tutorials | Vote
(OSVP) | Websets
Site background, images, and Layout © DymunArt™Creations, please do not copy or remove images without written permission from the webmistress.
|


