Tag TutorialView Other Artists Results 
|
|
This is an animated Signature Tag tutorial created in Corel Paint Shop Pro Photo XI and EZ Gif Animator. I hope you enjoy this tutorial. Please send me your finished tag. I would love to see your results!! Contact me via the link at the bottom of this page. What's needed: An Intermediate knowledge of PSP; Corel PSP - Get a Free Trial .:Here:. No Filters/Plugins needed I used the Art of Popeye Wong You can download this tube ::HERE:: Here are links for animation software: Animation Shop 3 EZ Gif Animator Ulead Gif Animator Supplies Mask, Preset Shape, Font and Gradient are included in the supplies File size: 84.4 kb Now Let's Get Started! 
You are welcome to take this pointer with you, You can keep track of where you are (just click and drag).
Open a blank 550x550 px canvas. Open your tube. Edit/copy close the tube. Edit/Paste as New Layer. Choose 2 colors from your tube and place in the foreground and background of the Materials palette.
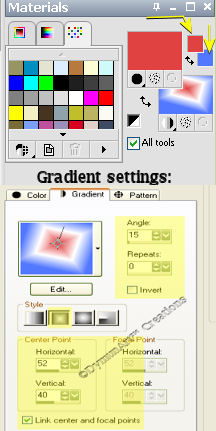
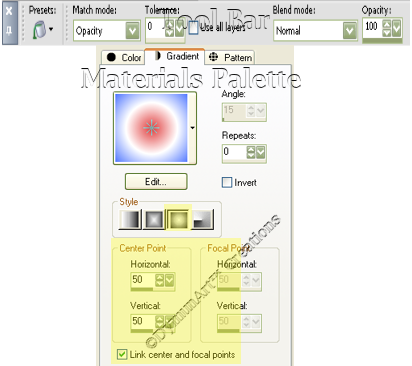
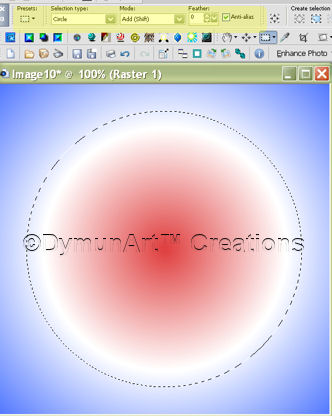
Flood fill the bottom layer. (Your tube should be the top layer, close it off for now). (See the diagram below for settings) Flood fill this layer. Get the 'Selections' tool, (see diagram below for settings) Draw a circle to encompass the circle on the layer. Selections/Invert; hit the delete key on your keyboard. Selecions/Select None. Apply the same drop shadow as the Mask/Tube layer. Duplicate this layer 2 times.
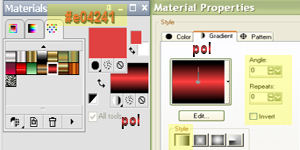
Draw a heart approximately 50x50 px Anti-alias checked, Create as Vector, Width=2.0, Meter=10. Layers/Convert to Raster Layer.
Duplicate this layer 2 times. Activate the 2nd Heart; Image/Resize 80%, all layers unchecked. Now activate the 3rd layer and resize by 60%.
Now you should have 9 layers. 3 Mask/Tube, 3 disks, and 3 Hearts.
You should know the drill by now but anyway (lol), close all layers except layer 1 of each group. Click on the first layer, Layers/Merge/Merge Visible. Close this layer. ANIMATIONActivate and open the 1st layer. Edit/Copy. Open your favorite animation software. Edit/Paste as new animation. Back to PSP. Click on and open your 2nd layer, Edit/Copy, back to animation software, Edit/Paste after current frame. Back to PSP repeat process with the 3rd layer. When you have the 3rd in frame in your animation software click on your 'Frame Properties and set the frame speed to 35 and save as a.gif file.
Thanks for trying my tutorial. Please send me your results to post on my artists results page. Home |About Me | Awards | Blog | Chat Room | Clip Art | Copyright | Contact | Fun Stuff | Gifts | Memberships | MySpace | Privacy Statement | Scrap Kits | Site Map | Stationary | Tags | Terms Of Use | Top Site | Tutorials | Vote (OSVP) | Websets Site background, images, and Layout © DymunArt™Creations, please do not copy or remove images without written permission from the webmistress. |